Have you ever wanted to draw beautiful birds but felt unsure where to start? You’re not alone.
Drawing birds can seem tricky, but with the right steps, you can create amazing artwork quickly and easily. This guide will show you exactly how to draw birds step by step, breaking down each part so you don’t feel overwhelmed.
By the end, you’ll have the confidence and skills to bring your favorite birds to life on paper. Ready to surprise yourself with what you can create? Let’s get started!

Credit: www.facebook.com
Choosing Your Bird Subject
Choosing a bird type is the first important step. Simple birds like sparrows or robins work well for beginners. They have clear shapes and easy details. Exotic birds with many colors can be tricky at first.
Find good reference images to help you. Use photos that show the bird from different angles. This helps you understand its shape and features better. Try to pick clear and bright pictures.
- Search online for bird photos.
- Use bird books or magazines.
- Take your own bird pictures if possible.
- Focus on images that show the bird’s body and wings clearly.

Credit: www.youtube.com
Gathering Drawing Materials
Gathering the right drawing materialshelps create better bird sketches.
Essential tools include:
- Pencilsof different hardness (HB, 2B, 4B) for light and dark lines
- Good quality eraserto fix mistakes easily
- Sharpenerto keep pencil tips fine
- Sketchbook or drawing paperwith smooth texture
Optional supplies bring extra detailsand depth:
- Colored pencilsto add color to your birds
- Fine liners or ink pensfor clear outlines
- Blending toolslike tissue or blending stumps for smooth shading
Basic Bird Shapes
Basic bird shapes help simplify drawing birds by breaking them into circles, ovals, and triangles. These simple forms make it easier to sketch birds step by step. Beginners can follow these shapes to create bird drawings quickly and clearly.
Sketching Simple Forms
Start with a basic oval for the bird’s body. Draw a smaller circle for the head. Connect the two shapes with a curved line. Add a triangle for the tail. Use simple lines for the wings.
Constructing The Body And Head
Make the body oval larger. Draw a larger circle for the head. Add a small triangle for the beak. Draw two circles for eyes. Use gentle curves for the neck and back. Keep lines smooth and soft.
Drawing Bird Features
Start by drawing a small triangle shape for the beak. Keep it simple and pointy. Place it near the center of the bird’s face. For the eyes, draw a small circle close to the beak. Add a tiny dot inside the circle to make the eye look alive. Eyes should be big enough to show expression but not too large.
For the wings, sketch long curved lines from the body. Use gentle curves to show softness. Add small feather shapes along the wing edge. The taillooks like a fan. Draw several thin, pointed shapes spreading out from the back. Keep the tail balanced with the wing size.
Adding Details And Texture
Feather patternsbring life to your bird drawing. Draw small, curved lines to show the direction of feathers. Use different shapes for wing and body feathers. Body feathers are usually round and soft. Wing feathers look long and sharp. Keep lines light at first, then darken the important ones.
Shading for depthmakes your bird look real. Shade under the wings and belly to show shadow. Use gentle strokes with your pencil. Darker shading means the area is farther or hidden. Leave some areas white for light reflection. This contrast gives your bird a 3D feel.
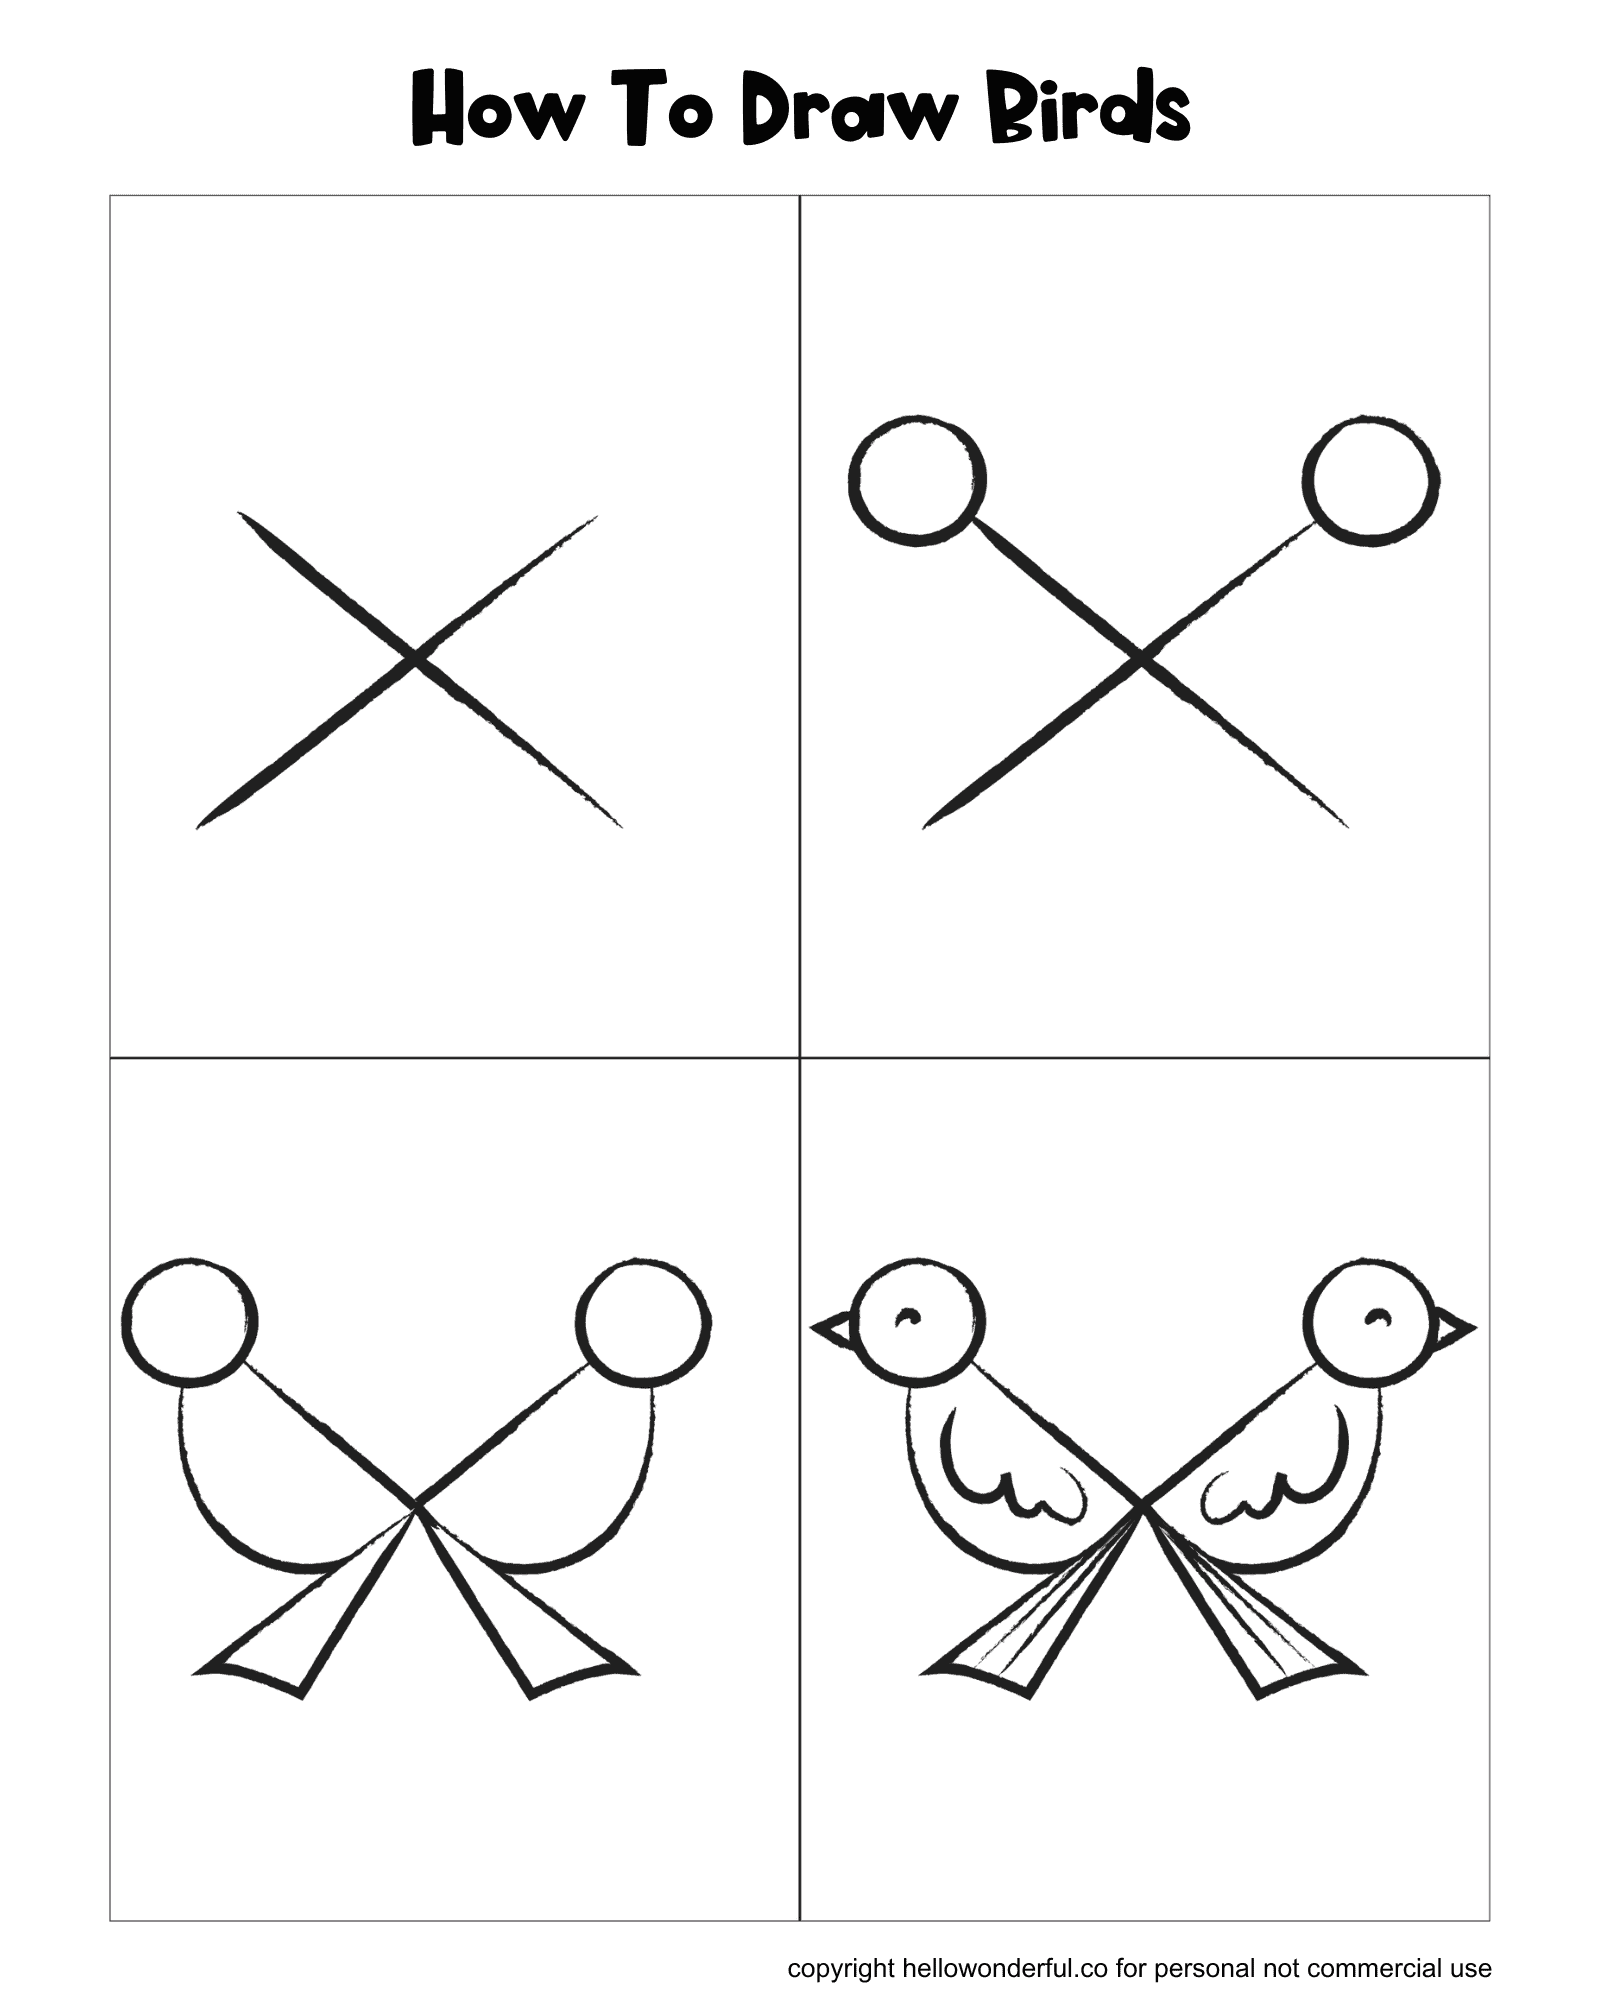
Credit: www.hellowonderful.co
Using Color To Enhance
Choosing the right colorsbrings your bird drawing to life. Soft, natural shades work best for realistic birds. Bright colors add fun and make your bird stand out. Use color palettesthat match the bird’s natural feathers for a true look.
Blending colors smoothly creates a soft, natural effect. Start with light colors, then gently add darker shades. Use a blending tool or your finger to mix colors. This helps avoid harsh lines and makes feathers look fluffy.
- Use light colorsfirst to set the base.
- Apply darker colorsto shaded areas.
- Blend colors with a soft tool or finger.
- Layer colors slowly for depth.
- Keep strokes gentle and small.
Common Mistakes To Avoid
Maintaining correct proportions and anglesis key for a bird drawing. Birds have unique body shapes. Their heads, wings, and tails must match real sizes. Avoid making the head too big or wings too small. Check the angles of the wings and legs carefully. Incorrect angles make the bird look unnatural.
Overworking the drawingis a common mistake. Adding too many lines can make your drawing messy. It is better to keep your lines simple and clean. Stop when the bird looks clear and balanced. Too much erasing or redrawing can damage the paper and confuse the shapes.
Practice Tips For Improvement
Practice drawing birds every day to improve your skills. Try simple sketches like a bird on a branch or a flying bird. Use different poses and angles to make your drawings more interesting.
Study bird anatomy to understand their shapes better. Focus on the head, wings, and tail. Notice how feathers overlap and how the body moves. This helps make drawings look real.
- Sketch a bird standing still.
- Draw a bird with open wings.
- Practice close-up of a bird’s eye or beak.
- Try quick, small sketches to capture movement.
Frequently Asked Questions
How Do I Start Drawing Birds Step By Step?
Begin with simple shapes like circles and ovals to form the bird’s body and head.
What Tools Are Best For Drawing Birds Easily?
Use pencils, erasers, and smooth paper for clean, easy sketching and corrections.
How Can I Add Details To Make Bird Drawings Realistic?
Focus on feathers, eyes, and beak shapes to bring your bird drawing to life.
Conclusion
Drawing birds step by step can be fun and relaxing. Practice each step slowly and with care. Watch your lines improve with every try. Birds come in many shapes and sizes. Try drawing different types to build your skills. Keep your tools ready and your mind calm.
Enjoy the process more than the result. Soon, you will see your drawings come alive. Keep drawing, and let your creativity soar. Simple steps make learning easy and enjoyable.