Are you ready to give your lawn the perfect watering routine without lifting a finger? Setting up your Rainbird sprinkler system might seem tricky at first, but with the right steps, you can have it running smoothly in no time.
Imagine saving water, keeping your grass green, and never worrying about watering again. In this guide, you’ll discover exactly how to install and program your Rainbird sprinkler system, making your yard the envy of the neighborhood. Keep reading, and you’ll be watering smarter, not harder.

Credit: manuals.plus
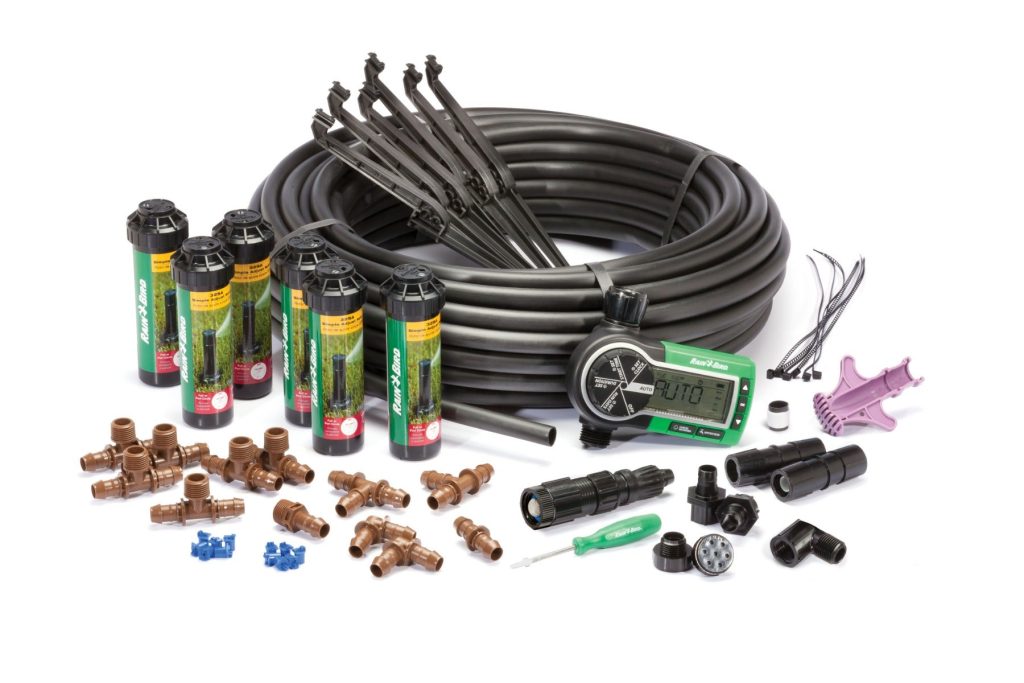
Choosing The Right Rainbird Sprinkler
Choosing the right Rainbird sprinklerdepends on your lawn size and plant types. Small areas need compact sprinklers. Larger lawns require sprinklers with a wide reach. Consider the water pressure; some sprinklers work best under low pressure.
Sprinklers come in different types:
- Rotor sprinklerscover large spaces with rotating streams.
- Spray headswork well for small, even areas.
- Drip irrigationsuits garden beds and shrubs.
Also, check the sprinkler’s radiusand adjustability. Adjustable sprinklers let you control the water flow and coverage. Choose models with durable materials to last long.

Credit: www.instagram.com
Planning Your Sprinkler Layout
Start by measuring your yard. Draw a simple map showing the lawn and garden beds. Mark the locations of plants that need water. Consider the shape and size of each area to cover.
Choose sprinkler heads that fit your yard. Some spray in a circle, others in a half or quarter circle. Mix types for best coverage.
Plan pipe routes carefully. Avoid running pipes under sidewalks or driveways if possible. Group sprinklers into zones based on water needs and sun exposure.
- Place sprinklers to avoid watering sidewalks and driveways.
- Keep sprinklers spaced to overlap spray areas slightly.
- Use separate zones for flower beds and lawn areas.
- Plan for easy access to valves and pipes.
Installing The Sprinkler System
Begin by choosing a flat area in your yard for easy installation. Mark the locations for sprinklers using flags or spray paint. Dig trenches about 6-12 inches deep to lay the pipes. Connect the pipes using the Rainbird connectors provided in the kit. Attach the sprinkler heads to the pipe ends, making sure they are flush with the ground level. Connect the system to your water source, usually an outdoor faucet or valve. Use Teflon tape on threaded connections to prevent leaks. Test the system by turning on the water and checking each sprinkler head. Adjust the spray direction and distance for even coverage. Cover the trenches with soil after testing to keep pipes secure. Regularly check for leaks or blockages to maintain good performance.
Credit: www.manualslib.com
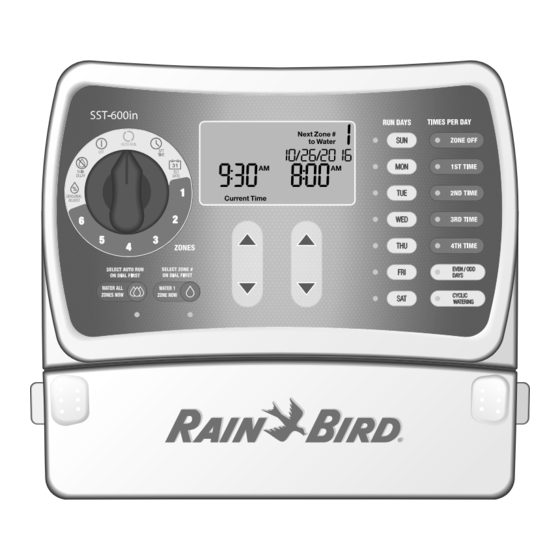
Connecting The Controller And Wiring
Start by placing the controlleron a wall. Make sure it’s near an outlet. Connect the wiresfrom the sprinkler valves to the controller. Each valve has its own wire. Use the color-coded wiresfor easy identification.
Attach the common wireto the “C” terminal. This wire is usually white. Connect each valve wire to its own terminal. Make sure the connections are tight. Loose wires can cause problems.
Plug the controller into a power source. Test the system by running a short cycle. Check if the sprinklersactivate correctly. Adjust the settings if necessary. Ensure the controlleris programmed for the right times and zones.
Testing And Adjusting The System
Turn on the sprinkler system to check each zone. Watch for even water coverageand proper spray patterns. Look for spots that are too wet or dry.
Adjust the sprinkler heads by twisting or lifting them. Make sure the spray reaches the desired areas without wasting water. Clear any clogged nozzles with a soft brush or needle.
- Check for leaks in pipes or connections.
- Listen for unusual sounds indicating pressure problems.
- Adjust the timer settings for watering duration and frequency.
Test the system at different times of day. Early morning is best for watering plants. Avoid watering during windy conditions to reduce waste.
Frequently Asked Questions
How Do I Install A Rainbird Sprinkler System?
Start by planning your layout and digging trenches for pipes. Connect pipes, valves, and sprinkler heads carefully.
What Tools Are Needed For Rainbird Sprinkler Setup?
You need a shovel, pipe cutter, pliers, screwdriver, Teflon tape, and a timer controller.
How To Program The Rainbird Sprinkler Timer?
Set current time first. Choose watering days, start times, and run duration. Save settings before exiting.
Conclusion
Setting up a Rainbird sprinkler system is easier than it seems. Follow each step carefully to avoid mistakes. Test your system after installation to ensure proper watering. Adjust the sprinkler heads for even coverage in your garden. Regular checks help keep your system working well.
Enjoy a healthy lawn with less effort and water waste. Simple tools and clear steps make this project manageable. Your garden will thank you with greener grass and flowers. Start today and see the benefits soon.