
Are you tired of guessing when and how long to water your lawn? Learning how to program a Rain Bird sprinkler system can save you time, water, and money.
Imagine having your garden watered perfectly, even when you’re not home. In this guide, you’ll discover simple steps to set up your Rain Bird controller quickly and easily. By the end, you’ll have full control over your watering schedule, making your lawn greener and healthier with less effort.
Keep reading to unlock the secrets of efficient irrigation that works around your lifestyle.

Credit: www.tiktok.com
Choosing The Right Rain Bird Controller
Rain Bird controllers come in several types. Each suits different yard sizes and watering needs.
- Basic Timers:Simple to use for small gardens.
- Smart Controllers:Connect to Wi-Fi for weather-based watering.
- Modular Controllers:Expandable for large areas or complex systems.
Choose a controller with these important features:
- Number of Zones:Matches the number of watering areas.
- Watering Schedules:Allows multiple start times per day.
- Manual Control:Lets you water anytime without changing settings.
- Rain Sensor Compatibility:Prevents watering during rain.
- Easy Programming:User-friendly interface for quick setup.
Credit: falajgarden.com
Gathering Necessary Tools And Materials
Gathering the right toolsis important for programming a Rain Bird system. Basic equipment includes:
- Rain Bird controller– the main device for programming.
- Power source– ensure the controller is plugged in or has batteries.
- Instruction manual– helps understand the controller functions.
- Pen and paper– for noting down schedules and zones.
Optional accessories can make programming easier or improve your system’s performance:
- Smartphone app– some models connect for remote control.
- Soil moisture sensor– adjusts watering based on soil wetness.
- Rain sensor– stops watering during rain to save water.
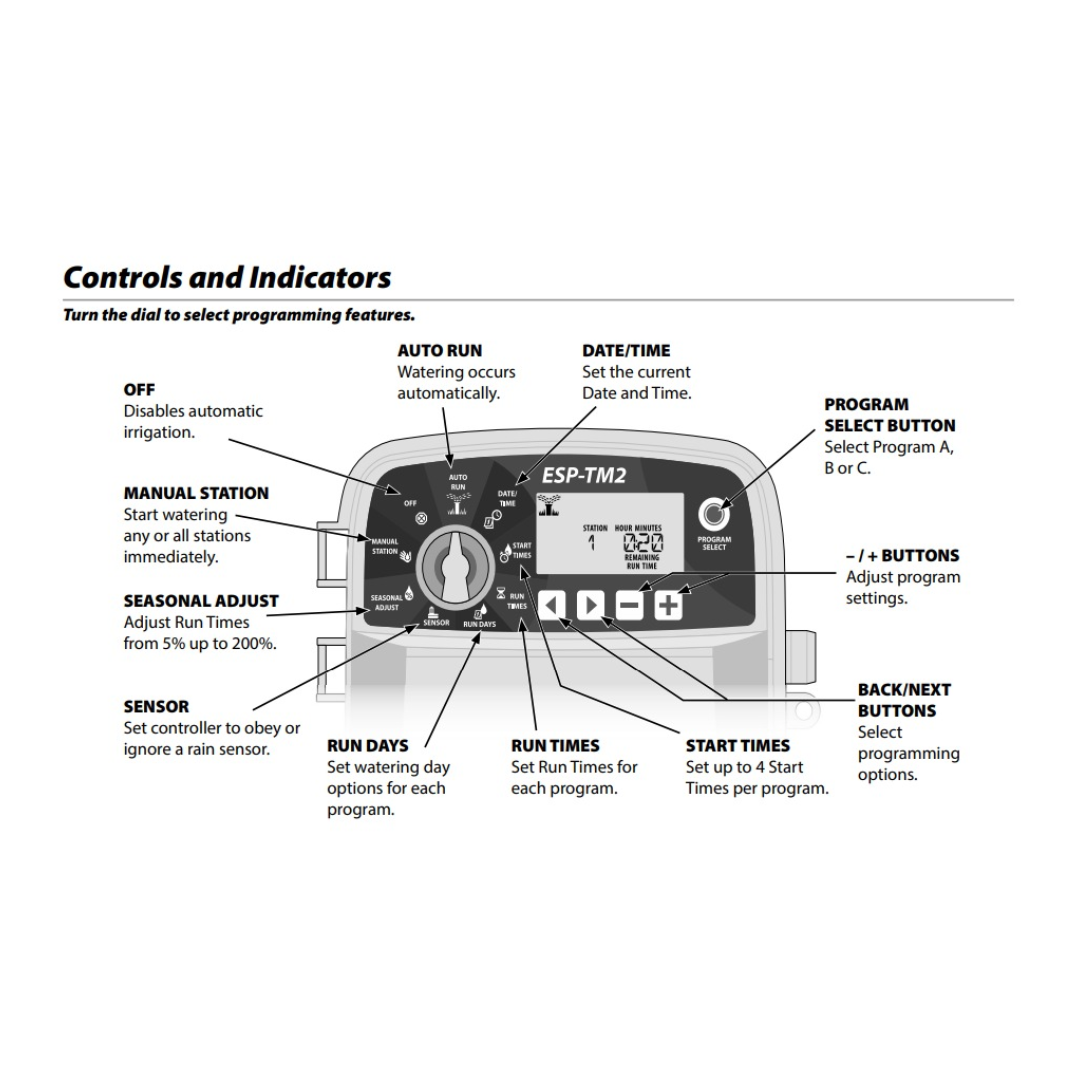
Setting Up The Controller
Begin by connecting the controller to a power source and your irrigation system. Set the current date and time to ensure accurate watering schedules. Follow the on-screen prompts to program zones and watering times easily.
Installing The Controller
The controller box should be near the water source. Attach it to a sturdy wall. Use screws to secure it tightly. Ensure the box is at eye level. This makes it easy to access. Check the weatherproof seal. It must protect against rain and dust. Connect the wires carefully. Follow the color codes on the manual. Double-check each connection. Mistakes can cause issues later. The controller must be grounded. This prevents electrical problems.
Powering The System
Ensure the power is off before starting. Plug the controller into a power source. Use a surge protector for safety. Turn on the power. The display should light up. If not, check the connections. The controller runs on electricity. Battery backup is also important. It saves settings during power loss. Insert batteries in the designated slot. Make sure they are fresh and working.
Programming The Watering Schedule
Select the days you want your sprinkler to water. Choose only days when watering is allowed in your area. Pick times when plants need water most, like early morning or late evening. Avoid watering during hot midday hours.
Adjust the run time to fit your plant’s needs. Shorter times for small gardens and longer for big areas. You can set different times for each zone. This saves water and helps plants stay healthy.
Seasonal adjustments help save water and protect plants. Increase watering in hot months and reduce it when it rains more. Use the controller’s seasonal setting to change water amounts easily.
Customizing Zones For Lawn Needs
Zones divide your lawn into sections for watering. Each zone should match a specific area with similar plants or grass types. This helps water reach every part correctly.
Start by walking your yard and noting different plant types or sun exposure. This will guide the zone setup. Label each zone on a map for easy reference.
- Check for areas with flowers, shrubs, or grass.
- Note parts that get more sun or shade.
- Look for slopes or flat areas that need different water amounts.
Program zones in your Rain Bird controller by selecting each zone number. Set watering time based on plant needs and soil type.
Adjust watering days and start times for each zone to avoid overwatering. Save the settings and test each zone to ensure proper coverage.
Testing And Troubleshooting
Running a manual test helps check if the Rain Bird system works well. Use the controller to start one zone. Watch the sprinkler heads to see if water sprays evenly. Listen for unusual noises from valves or pumps. This quick test shows if programming is correct.
Common issues often include no water flow, weak spray, or valve noise. Sometimes valves don’t open because wires are loose or damaged. Check all wire connections and tighten if needed. Dirt or debris can block sprinkler heads, so clean them regularly.
| Issue | Cause | Fix |
|---|---|---|
| No water flow | Loose wire or valve stuck | Check wiring and clean valve |
| Weak spray | Clogged sprinkler head | Remove debris and clean head |
| Valve noise | Debris or faulty valve | Flush valve or replace it |
Maintaining Your Rain Bird System
Check your Rain Bird system regularly to ensure proper function. Look for clogged nozzles, leaks, or broken sprinkler heads. Clear any debris blocking water flow to keep the system efficient. Test each zone to confirm sprinklers cover the intended area.
Winterizing helps protect your system in cold weather. Drain all water from pipes and valves to prevent freezing damage. Use an air compressor to blow out remaining water from the lines. Cover exposed parts to shield them from frost. Shut off the main water supply to avoid leaks during winter.

Credit: www.tiktok.com
Frequently Asked Questions
How Do I Set The Time On My Rain Bird Controller?
Press the “Set Clock” button, then use the arrow keys to adjust the time and confirm.
How Can I Program Watering Schedules On A Rain Bird?
Select the program, set start times, watering days, and run times for each zone.
What Should I Do If My Rain Bird Won’t Start Watering?
Check the power, wiring, and valve connections; reset the controller if needed.
Conclusion
Programming your Rain Bird sprinkler keeps your garden healthy and green. Set the times and days carefully for best water use. Check the settings often to avoid watering too much or too little. Save water and money by watering only when needed.
A well-programmed system means less work for you. Enjoy a beautiful yard with less effort. Keep your Rain Bird running smoothly for seasons to come. Simple steps make a big difference in your lawn’s care.