Are you ready to transform your lawn into a lush, green oasis without the hassle? Setting up a Rain Bird sprinkler system can save you time, water, and effort while keeping your garden healthy all year round.
In this guide, you’ll discover simple steps to install your system quickly and easily—even if you’re not a gardening expert. By the end, you’ll have everything you need to give your plants the perfect drink, exactly when they need it.
Keep reading, and let’s make your yard the envy of the neighborhood!
Credit: www.manualslib.com
Choosing The Right Sprinkler System
Choosing the right Rain Bird sprinkler system depends on your lawn size and water pressure. Different systems fit different needs.
| Type of Rain Bird System | Best For | Features |
|---|---|---|
| Rotor Systems | Large lawns | Covers big areas with fewer heads, moves water in a spray |
| Spray Systems | Small to medium lawns | Fixed spray pattern, covers smaller zones |
| Drip Systems | Gardens, flower beds | Delivers water slowly to roots, saves water |
Assess your lawn size carefully to decide the system type. Large lawns need rotors; small ones use sprays.
Water pressure is key. Too low, and sprinklers won’t work well. Check your home’s water pressure before buying.
Planning Your Sprinkler Layout
Start by drawing a simple map of your yard. Mark all important areas like flower beds, trees, and lawn sections. This helps see where water is needed most.
Find the main water source for your sprinkler system. Usually, this is an outdoor faucet or a water line. Mark it clearly on your yard map.
Sprinklers should be placed to cover all parts of the yard evenly. Avoid watering sidewalks or driveways to save water. Use the map to decide the best spots for each sprinkler head.
- Place sprinklers near plants and grass that need regular watering.
- Keep sprinklers away from walls and fences to prevent water waste.
- Overlap sprinkler spray slightly for full coverage without dry spots.
Installing The Components
Begin by placing all parts in the desired spots, like valves, pipes, and sprinkler heads. Connect each component securely to ensure water flows smoothly through the system. Double-check all fittings to avoid leaks and prepare for testing.
Digging Trenches And Laying Pipes
Begin by planning where the trenches will go. Use a shovel to dig them carefully. Make sure they are deep enough for the pipes. Lay the pipes in the trenches, ensuring they are straight. Connect the pipes securely. Check for leaks by running water through them.
Setting Up Sprinkler Heads
Place the sprinkler heads along the pipes. Position them in areas that need water. Adjust the heads to spray evenly. Secure them tightly to avoid wobbling. Test the sprinklers to ensure they work properly.
Connecting Valves And Controllers
Attach the valves to the main pipe. Ensure they are tight and secure. Connect the controllers to the valves. Set the timers on the controllers for different watering times. Double-check all connections for leaks or loose parts.

Credit: www.tiktok.com
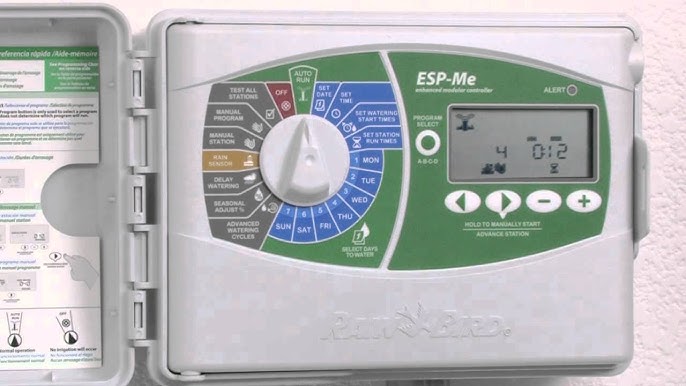
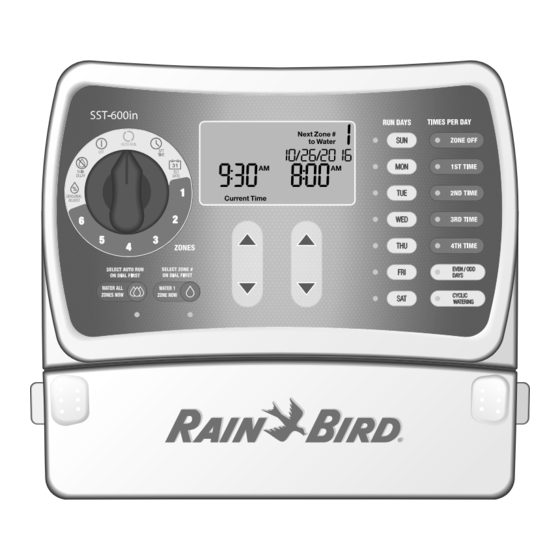
Programming The Controller
Programming the Rain Bird controller is simple and key for proper watering. Start by setting the watering schedules. Choose days of the week and times for watering. Keep in mind how long each zone needs water. Shorter times for grass, longer for shrubs.
Adjust the schedule for seasonal changes. Water less in cooler months and more in hot months. This saves water and keeps plants healthy. Many controllers have a seasonal adjustmentfeature for easy changes.
Use smart featuresif your controller supports them. Connect to weather sensors or Wi-Fi. This helps the system skip watering on rainy days. It also adjusts watering based on temperature and humidity. Smart features make watering more efficient and easy.
Testing And Maintenance Tips
Check all sprinkler heads and pipes for any water leaks. Small leaks waste water and reduce system pressure. Look for wet spots or pooling water in your lawn. Tighten or replace parts that leak to save water and keep the system working well.
Adjust the spray patterns to cover your lawn evenly. Make sure water reaches all areas without spraying on driveways or sidewalks. Use the sprinkler’s adjustment screw or rotate the head to change the spray direction and distance. Proper adjustment helps save water and keeps plants healthy.
Perform regular maintenance by running the system monthly. Clean or replace clogged nozzles and check the timer settings. Remove any dirt or debris from sprinkler heads. Winterize the system before cold weather to avoid damage. Regular care extends the life of your Rain Bird sprinkler system and keeps it efficient.

Credit: www.tiktok.com
Frequently Asked Questions
How Do I Connect Rain Bird Sprinkler System To Water Supply?
Turn off your main water valve first. Attach the Rain Bird system to the hose bib using a backflow preventer. Ensure all connections are tight to avoid leaks.
What Tools Are Needed To Install Rain Bird Sprinkler System?
You need a shovel, pipe cutter, Teflon tape, and a screwdriver. These help dig trenches, cut pipes, and secure fittings properly.
How To Program Rain Bird Sprinkler Controller Easily?
Use the manual to set current time and watering days. Adjust watering duration for each zone based on plant needs. Simple steps make programming quick.
Conclusion
Setting up your Rain Bird sprinkler system can save water and time. Follow each step carefully to ensure proper installation. Test the system to check for leaks and coverage. Adjust sprinkler heads to water all areas evenly. Regular maintenance keeps your system running well.
Enjoy a healthy, green lawn with less effort. Simple steps lead to great results. Start watering smart today.