Have you ever wanted to draw a bird wing that looks real and full of life? Whether you’re a beginner or just looking to improve your skills, learning how to draw a bird wing can be both fun and rewarding.
Imagine creating wings that seem to flutter right off the page—capturing every feather and curve with ease. In this guide, you’ll discover simple steps that make drawing bird wings easier than you think. Ready to bring your artwork to the next level?
Keep reading, and soon you’ll be drawing wings that amaze everyone.

Credit: mx.pinterest.com
Materials Needed
Basic supplies include pencils, an eraser, and paper for sketching. A reference image helps capture wing details accurately. Optional tools like colored pencils or markers can add depth and color.
- Pencils:Use different hardness like HB and 2B for shading.
- Eraser:A soft eraser helps fix mistakes without tearing paper.
- Paper:Choose smooth drawing paper for clean lines.
- Ruler:Useful for drawing straight guidelines.
- Sharpener:Keep pencils sharp for detailed work.
- Reference Images:Real bird wing photos help with accuracy.
Basic Wing Shapes
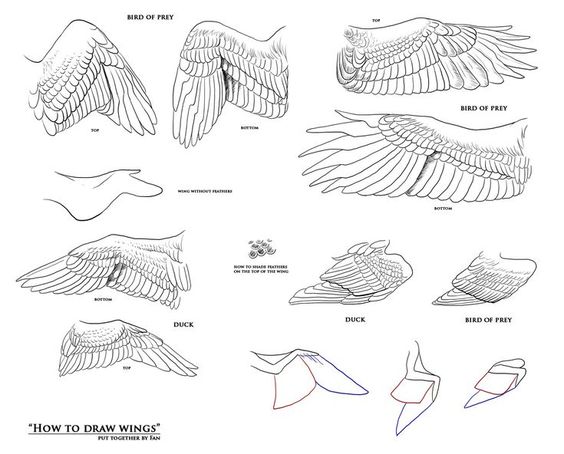
The wing anatomyincludes three main parts: the arm, forearm, and hand. Feathers attach to these parts and help birds fly. The primary feathersgrow from the hand and are long for flight. The secondary feathersare shorter and attach to the forearm. The wing shape changes with the bird’s needs.
| Wing TypeDescriptionExample Bird | ||
|---|---|---|
| Elliptical | Short and rounded wings for quick turns | Robin |
| High-Speed | Long and narrow wings for fast flight | Swallow |
| Soaring | Wide wings with slotted tips for gliding | Eagle |
| High-Lift | Large wings for carrying heavy loads | Vulture |
Sketching The Outline
Start with a simple line drawingof the wing’s main shape. Use soft pencil strokes to create the wing frame. This frame acts as a guide for the rest of the drawing. Draw a slightly curved line to show the wing’s top edge. Add a parallel line below for the bottom edge.
Sketch the wing bonesinside the frame. These help to position the feathers correctly. Keep the shapes simple and clear. This step gives structure and balance to your wing sketch.
- Draw the primary feathersas long, thin shapes at the wing tip.
- Start from the outer edge of the wing frame.
- Make feathers overlap slightly for a natural look.
- Keep feather tips pointed and slightly curved.
Detailing Feathers
Drawing bird wings becomes easier by focusing on feather shapes and layering. Begin with broad strokes, then add thin, curved lines to show feather details clearly. This approach helps create a natural, lifelike wing appearance.
Layering Feathers
Feathers overlap in layers to give wings a full look. Start with the base feathers, drawing large shapes near the wing’s edge. Then add smaller feathers on top, closer to the wing’s center. This creates a natural, layered effect. Keep the feather shapes simple and curved. Avoid straight lines to show softness.
Creating Feather Texture
Use short, light strokes to draw the feather texture. Draw lines that follow the feather’s curve. Space lines closer at the feather’s base and spread them out near the tip. This shows how feathers get thinner at the end. Draw tiny lines along the edge to show feather strands. Use gentle shading to add depth.
Shading And Highlights
Decide where the light sourceis coming from before shading. This helps place highlightsand shadowscorrectly. Shadows appear on parts away from the light. Highlights go on areas facing the light.
Shading adds depthand makes the wing look real. Use soft strokesfor smooth feathers. Darken areas near the wing base or under feathers for shadoweffect.
- Place light source at top-left or top-right for natural look
- Shade feathers on opposite side of the light source
- Use lighter tones on feathers catching light
- Blend shadows softly for smooth transition

Credit: www.freepik.com
Final Touches
Shading adds depth and realism to a bird wing drawing. Soft strokes highlight feathers’ texture and natural curves. Adjust pressure for varied intensity, capturing intricate details effortlessly.
Refining Lines
Check your lines closely. Some lines may look rough or uneven. Smooth these lines for a cleaner look. Use a sharp pencil for crisp edges. Erase lightly to avoid paper damage. Add small details for realism. Feather tips can be more defined. This adds depth to your drawing.
Enhancing Contrast
Dark areas need shading. Create contrast between light and dark parts. This makes the wing pop. Use a softer pencil for shading. Blend lightly with your finger or tool. Highlight brighter areas for balance. This gives the wing a three-dimensional look. Contrast is key for a striking image.
Tips For Realistic Wings
Study bird wings carefully before drawing. Notice the shapeand feather layers. Wings have three parts: primary feathers, secondary feathers, and coverts. Each part has different feather sizes and directions.
Draw the wing outline first, using smooth lines. Add feathers in layers, starting from the base. Make feathers overlapslightly to show depth. Use short, curved strokes to create texture.
Observe how feathers near the wingtip are thinner and longer. The feathers near the base are wider and shorter. This helps the wing look naturaland realistic.
- Keep feathers pointed, not too round.
- Vary feather length for realism.
- Use light shading for feather texture.
- Draw the wing slightly curved for motion.

Credit: www.tiktok.com
Frequently Asked Questions
How Do I Start Drawing A Bird Wing?
Begin with a simple outline of the wing shape. Draw basic lines for feathers and structure.
What Are The Key Parts Of A Bird Wing To Draw?
Focus on the primary feathers, secondary feathers, and the wing’s base near the body.
How Can I Make Bird Wings Look Realistic In Drawings?
Use light shading and varied feather sizes. Add slight curves to show natural wing movement.
Conclusion
Drawing a bird wing can be simple and fun. Practice shapes and lines step by step. Watch bird photos to see wing details clearly. Try different wing positions to improve your skills. Keep your strokes light and patient. You will see progress with time and effort.
Enjoy the process and don’t rush. Drawing helps you notice nature’s beauty more. Now, take your pencil and start creating!